
THM Walkthrough : Blog

THM Room : Blog

Link : https://tryhackme.com/room/blog

Objective : Grab the root & user flags by exploiting the vulnerability in WordPress version. [CVE-2019-8942,CVE-2019-8943]

Access the IP from your browser. That returns a non-formatted webpage, that hints you may add the URL in the hosts file.


Add the URL in the hosts file. If you go through the web page source in your browser, you can see that many of the page links are called using the URL blog.thm. If you enumerate more, you can also find the WordPress version as well. Or you could find it using the wpscan tool.

Perform the nmap scan.

So we have ssh, web and samba share. Lets explore the samba share.


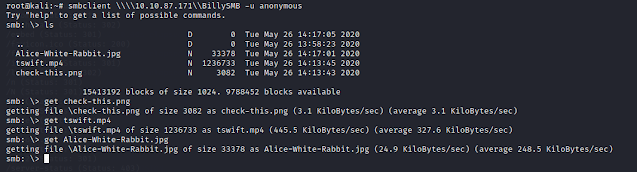
Nice, we can get some files from here. So i used steg tools and found a text file.

And unfortunately, its a rabbit hole.
Now lets perform a directory scan. I have used my favorite tool gobuster for this.


We can see a large number of directories, but not much use with this room objective.
Now, since we know that the website is hosted in wordpress, lets use wpscan to enumerate the users in it.


So we have identified some valid users. But which one we can use? bjoel is Billy Joel and he is supposed to be the admin of the page and Karen Wheeler is his mom. We can see some of the comments made by them in the website as well.

Lets perform a brute force attack to get the credentials. I have done it for both users and we could find the password of Karen.


Cool. We know know the user credentials. We can log in to the WordPress admin console and since Karen is a normal user, we cannot edit the configurations in it.

Since we know the WordPress version, lets search over the web for any known exploit. And we can find one.


We can see that a Metasploit module is available for this particular exploit.

Open metasploit and use the rce. Set all the required options and run the module.


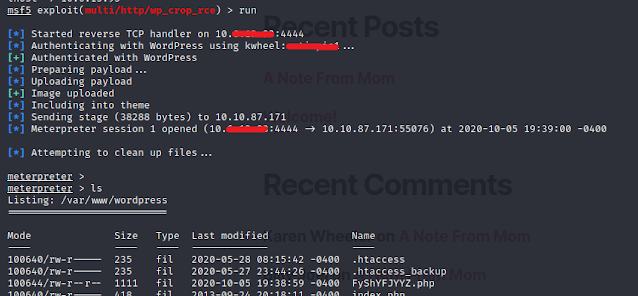
Great. We got the meterpreter shell and now access the shell. You can go through the home directory and can find the user.txt under bjoel user folder. but again, its a rabbit hole. No flags in it.

Search for SUID files.


So, we can see one unusual binary, checker.
Search about it on the internet and i couldn't find anything particular about it. So i assumed its a custom made and might be out shot.

Use ltrace to find more about the binary. We can see this checker just gets the “admin” env variable and checks if it’s not null.
So assign something to admin and hack the program.


Run the checker and now we are root.
Search for the user flag.


That's it. We got the both root & user flags. Happy hacking.

For more articles : https://www.jaacostan.com/search/label/hacking


Popular Posts

RUST error: linker `link.exe` not found

While compiling Rust program in a windows environment, you may encounter the error : linker `link.exe` not found. This is because of the absence of the C++ build tools in your machine. For compiling Rust programs successfully, one of the prerequisites is the installation of the Build Tools for Visual Studio 2019.   Download the Visual Studio 2019 Build tools from the Microsoft website. After the download, while installing the Build tools, make sure that you install the required components (highlighted in Yellow) This will download around 1.2GB of required files. Once everything is successfully installed, reboot and re-run your rust program and it will compile successfully.   Read More on RUST Hello World Rust Program : Code explained RUST Cargo Package Manager Explained Data Representation in Rust.

Download Microsoft Office 2019 offline installer.

When you do malware analysis of documents or office files, it is important to have Microsoft Office installed in your Lab machine. I am using flare VM and it doesn't comes with MS Office. Since Microsoft is promoting Microsoft 365 over the offline version, finding the offline installer is not that easy. Here is the list of genuine Microsoft links to download the office .img files.  Download Microsoft Office 2019 Professional Plus : https://officecdn.microsoft.com/db/492350F6-3A01-4F97-B9C0-C7C6DDF67D60/media/en-US/ProPlus2019Retail.img Download Microsoft Office 2019 Professional : https://officecdn.microsoft.com/db/492350F6-3A01-4F97-B9C0-C7C6DDF67D60/media/en-US/Professional2019Retail.img Download Microsoft Office 2019 Home and Business : https://officecdn.microsoft.com/db/492350F6-3A01-4F97-B9C0-C7C6DDF67D60/media/en-US/HomeBusiness2019Retail.img Download Microsoft Office 2019 Home and Student : https://officecdn.microsoft.com/db/492350F6-3A01-4F97-B9C0-C7C6DDF67D60/media/en-U...

Cisco ASA: Disable SSLv3 and configure TLSv1.2.

For configuring TLS v1.2, the ASA should run software version 9.3(2) or later. In earlier versions of ASA, TLS 1.2 is not supported.If you are running the old version, it's time to upgrade. But before that i will show you the config prior to the change. I am running ASA version 9.6.1 Now ,set the server-version to tlsv1.2, though ASA supports version tlsv1.1, its always better to configure the connection to more secure. Server here in the sense, the ASA will be act as the server and the client will connect to the ASA.     #ssl server-version tlsv1.2 set the client-version to tlsv1.2, if required.     #ssl client-version tlsv1.2 ssl cipher command in ASA offers 5 predefined security levels and an additional custom level.     #ssl cipher tlsv1.2 high we can see the setting of each cipher levels using #show ssl cipher command. Now set the DH group to 24, which is the strongest offered as of now in the AS...

How to Install Netmiko on Windows?

Netmiko, developed by kirk Byers is an open source python library  based on Paramiko which simplifies SSH management to network devices and is primarily used for network automation tasks. Installing Netmiko in linux is a matter o f one single command but if you need to use Netmiko in your Windows PC, follow this process. 1) Install the latest version of Python. 2) Install Anaconda, which is an opensource distribution platform that you can install in Windows and other OS's (https://www.anaconda.com/download/) 3) From the Anaconda Shell, run “ conda install paramiko ”. 4) From the Anaconda Shell, run “ pip install scp ”. 5) Now Install the Git for Windows. (https://www.git-scm.com/downloads) . Git is required for downloading and cloning all the Netmiko library files from Github. 6) From Git Bash window, Clone Netmiko using the following command git clone https://github.com/ktbyers/netmiko&#8221         7) Onc...

PrintNightmare (CVE-2021-1675) PoC exploit Walkthrough

I am not an exploit developer but was interested to see how this vulnerability can be exploited. So i tried to replicate the infamous PrintNightmare vulnerability using the following PoCs ( https://github.com/cube0x0/CVE-2021-1675 ) and ( https://github.com/rapid7/metasploit-framework/pull/15385 ) However i had trouble with the new metasploit module (auxiliary/admin/dcerpc/cve_2021_1675_printnightmare) and i couldn't able to exploit the machine successfully. So i tried the second PoC from cube0x0. This one has done the magic. I just followed the guidelines with couple of tweaks. First of all, i installed the impacket (cube0x0 version) which will install the required modules and files. After that i set up a samba share with an anonymous login. This is required for hosting the dll file. I edited the smb.conf with the following settings. [global]     map to guest = Bad User     server role = standalone server     usershare allow guests = yes ...

Unable to locate package linux-headers / E: Unable to locate package linux-headers-5.10.0-kali5-amd64

While compiling programs, you may encounter this particular error. E: Unable to locate package linux-headers-5.10.0-kali5-amd64 I encountered this while compiling a C code. To fix this, i first updated my Kali machine (v2020.2a).  sudo apt update -y && apt upgrade -y && apt dist-upgrade   Rebooted. Then installed the headers.   sudo apt install linux-headers-$(uname -r)  

Google Cloud : Basic Cloud Shell commands

Google Cloud resources can be managed in multiple ways. It can be done using Cloud Console, SDK or by using Cloud Shell. A few basic Google Cloud shell commands are listed below. 1)    List the active account name gcloud auth list 2)    List the project ID gcloud config list project 3)    Create a new instance using Gcloud shell gcloud compute instances create [INSTANCE_NAME] --machine-type n1-standard-2 --zone [ZONE_NAME] Use gcloud compute machine-types list to view a list of machine types available in particular zone. If the additional parameters, such as a zone is not specified, Google Cloud will use the information from your default project. To view the default project information, use gcloud compute project-info describe 4)    SSH in to the machine gcloud compute ssh [INSTANCE_NAME] --zone [YOUR_ZONE] 5)    RDP a windows server gcloud compute instances get-serial-port-output [INSTANCE_NAME...